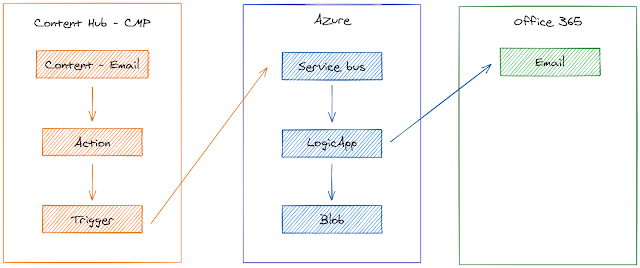
During the last post, I wrote about the different integrations possibilities of the Content Hub. This time, we will take a dive into Azure Logic Apps. Before we take a deep dive into all the technical stuff, lets first start with the explanation of what an Azure Logic App is. If you are already familiar with them, scroll down a bit.
What are Azure Logic Apps?
Azure Logic Apps is a cloud service that helps you schedule, automate, and orchestrate tasks, business processes, and workflows when you need to integrate apps, data, systems, and services across enterprises or organizations. Logic Apps simplifies how you design and build scalable solutions for app integration, data integration, system integration, enterprise application integration (EAI), and business-to-business (B2B) communication, whether in the cloud, on-premises, or both.
How do logic apps work?
Every logic app workflow starts with a trigger, which fires when a specific event happens, or when new available data meets specific criteria. Many triggers provided by the connectors in Logic Apps include basic scheduling capabilities so that you can set up how regularly your workloads run. For more complex scheduling or advanced recurrences, you can use a Recurrence trigger as the first step in any workflow. Learn more about schedule-based workflows.
Each time that the trigger fires, the Logic Apps engine creates a logic app instance that runs the actions in the workflow. These actions can also include data conversions and workflow controls, such as conditional statements, switch statements, loops, and branching. For example, this logic app starts with a Dynamics 365 trigger with the built-in criteria "When a record is updated". If the trigger detects an event that matches this criteria, the trigger fires and runs the workflow's actions. Here, these actions include XML transformation, data updates, decision branching, and email notifications.
* Copied from Microsoft documentations
To summarize Azure Logic Apps is a serverless platform in the cloud that let's do you all kinds of automated tasks and integrate all kinds of data across all platforms. Since this is now clear, let's start with the technical stuff.
For this example, I'm going to use the following components.
In a
previous blog post I already wrote about the Content Hub, Sitecore CMP Connector and the Azure Service Bus. In that post, it was explained how to set up the trigger, action and configure the Service Bus. If you want to play around with Azure resources for free, check out
this link. For now, let's start on creating our very first Logic App.
To start working on a Logic App, we first need to create the resource in the Azure Portal. Go to
https://portal.azure.com and log in. In the top left click on "+ Create a resource" and search for Logic App. Be sure to click on the Logic App from Microsoft. Be aware, don't click on the preview version!
Create the resource with the appropriate information and what wait for it to be created.
Tip: be sure to remove an Azure resource when you aren't using them. Although they are in suspense mode, some services will still keep charging. Check out the Azure documentation to see if that implies for your resource.
When the Logic App has been created, go to the resource. Once loaded click on the "Black Logic App". This will open the "Logic app designer" and we can start our design process. As with all processes, they need a trigger to start doing their work. For this example, we will use the Service Bus trigger "When a message is received in a topic subscription (auto-complete). If you are using a queue instead of a topic. Select the first option "When a message is received in a queue (auto-complete).
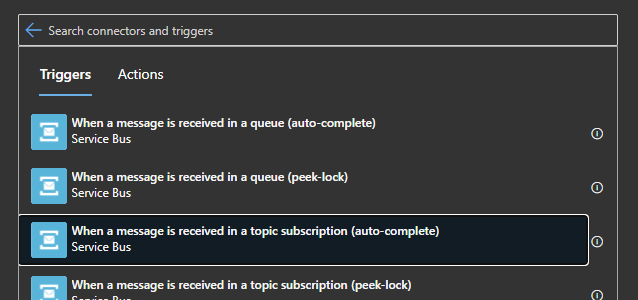
After selecting the trigger, fill in your Service Bus information. Now click on "Save" at the top of the page. We now have created the trigger part of our Logic App. You can now click on "Run" to see if the trigger gets hit. To activate the trigger in Logic App you need to make a change and save a change in the content item. This will send a message to the Service Bus, what will trigger the Logic App. Within a minute, you will see that the trigger will have been activated. Once you verified that the app got triggered, open up the designer.
Add a new step and search for "Parse JSON". Now that we receive the Service Bus message, we can start retrieving the identifier of the change entity.
Paste the following text as schema:
{
"properties": {
"content": {
"properties": {
"ContentData": {
"type": "string"
},
"ContentTransferEncoding": {
"type": "string"
},
"ContentType": {
"type": "string"
},
"CorrelationId": {},
"Label": {},
"LockToken": {
"type": "string"
},
"MessageId": {
"type": "string"
},
"Properties": {
"properties": {
"DeliveryCount": {
"type": "string"
},
"EnqueuedSequenceNumber": {
"type": "string"
},
"EnqueuedTimeUtc": {
"type": "string"
},
"ExpiresAtUtc": {
"type": "string"
},
"LockToken": {
"type": "string"
},
"LockedUntilUtc": {
"type": "string"
},
"MessageId": {
"type": "string"
},
"ScheduledEnqueueTimeUtc": {
"type": "string"
},
"SequenceNumber": {
"type": "string"
},
"Size": {
"type": "string"
},
"State": {
"type": "string"
},
"TimeToLive": {
"type": "string"
},
"action_execution_source": {
"type": "string"
},
"event": {
"type": "string"
},
"global_identifier": {
"type": "string"
},
"id": {
"type": "string"
},
"is_new": {
"type": "string"
},
"message_type": {
"type": "string"
},
"target_definition": {
"type": "string"
},
"target_id": {
"type": "string"
},
"time_stamp": {
"type": "string"
},
"user_id": {
"type": "string"
}
},
"type": "object"
},
"ReplyTo": {},
"ReplyToSessionId": {},
"ScheduledEnqueueTimeUtc": {
"type": "string"
},
"SequenceNumber": {
"type": "integer"
},
"SessionId": {},
"TimeToLive": {
"type": "string"
},
"To": {}
},
"type": "object"
}
},
"type": "object"
}
The schema can also be created by copy / pasting the JSON into the schema generator. When finished we can start with the actual connection to the Content Hub. Once again, click on the "+ New step" to add another step. This time search for "Marketing Content Hub". Note: at the moment of writing, the Logic App plugin is still in preview. Therefore it isn't recommended to use this in production. Select the action "Get Entity By Identifier". For the entity definition, we will select "Content". If you're working with another definition, select the appropriate one. The next field is a bit tricky. It took me a bit to figure out what field to use here. It's actually the identifier of the entity that is required. Don't fill in the entity id like I did, because it won't work! For the Entity identifier, choose "global_identifier". This field contains the identifier of the Content Hub entity.
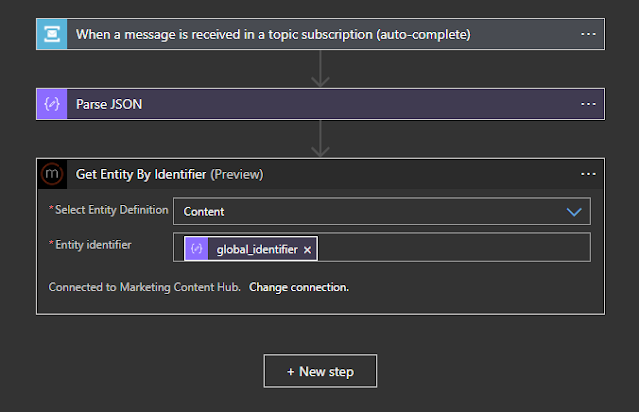
Create a Connection between Logic App and Content Hub
- Fill in the FQDN of your Content Hub instance "[your instance].stylelabs.io". *
- Sign in with the user of your choosing
- Grant the Logic App the user rights
* If the process fails with the message that client id and secret are invalid. Make sure to update the redirect URL in OAuth setting of LogicApp. Also, add the user account that is going to be used for the Logic App.
After this step, we have another JSON payload, this time from the Content Hub containing our entity. We need to parse the JSON once more. Add a new step and select the "Parse JSON" action. For the Content Select the "Content" field.
Paste the following text as schema:
{
"properties": {
"16b54_Body": {
"type": "string"
},
"16b54_Tagline": {
"type": "string"
},
"16b54_Title": {
"type": "string"
},
"3d9dd_Tweede": {
"type": "string"
},
"3d9dd_test": {
"type": "string"
},
"Advertisement_Body": {
"type": "string"
},
"Advertisement_Title": {
"type": "string"
},
"Blog_Body": {
"type": "string"
},
"Blog_Quote": {
"type": "string"
},
"Blog_Title": {
"type": "string"
},
"Content.ApprovedForCreation": {
"type": "boolean"
},
"Content.Brief": {
"type": "string"
},
"Content.ContentCompletenessStatus": {
"type": "string"
},
"Content.ContentStoryPoints": {
"type": "string"
},
"Content.DaysFromCampaignStart": {
"type": "string"
},
"Content.DynamicPublishDate": {
"type": "string"
},
"Content.ExpirationDate": {
"type": "string"
},
"Content.Impact": {
"type": "string"
},
"Content.IsInIdeationState": {
"type": "string"
},
"Content.Name": {
"type": "string"
},
"Content.NumberOfCreatedVersions": {
"type": "integer"
},
"Content.PublicationDate": {
"type": "string"
},
"Content.PublishedOn": {
"type": "string"
},
"Content.StrategyCompletenessStatus": {
"properties": {
"identifier": {
"type": "string"
},
"labels": {
"properties": {
"en-US": {
"type": "string"
}
},
"type": "object"
}
},
"type": "object"
},
"Content.Variant": {
"properties": {
"identifier": {
"type": "string"
},
"labels": {
"properties": {
"en-US": {
"type": "string"
}
},
"type": "object"
}
},
"type": "object"
},
"Email_Body": {
"type": "string"
},
"Email_Recipients": {
"type": "string"
},
"Email_Sender": {
"type": "string"
},
"Email_Subject": {
"type": "string"
},
"MasterAssetIsContent": {
"type": "string"
},
"Recipe_Cookinginstructions": {
"type": "string"
},
"Recipe_Ingredients": {
"type": "string"
},
"Recipe_Nutritionalfacts": {
"type": "string"
},
"Recipe_Title": {
"type": "string"
},
"SocialMediaMessage_Body": {
"type": "string"
},
"SocialMediaMessage_Footer": {
"type": "string"
},
"Webinar_Description": {
"type": "string"
},
"Webinar_Title": {
"type": "string"
},
"WhitePaper_Body": {
"type": "string"
},
"WhitePaper_Footer": {
"type": "string"
},
"WhitePaper_Header": {
"type": "string"
},
"WhitePaper_Title": {
"type": "string"
},
"id": {
"type": "integer"
},
"identifier": {
"type": "string"
},
"renditions": {
"properties": {},
"type": "object"
},
"version": {
"type": "integer"
}
},
"type": "object"
}
As you can see, this contains the full schema of the "Content" entity definition. You can limit the number of fields, but clean out the schema of fields that you don't need.
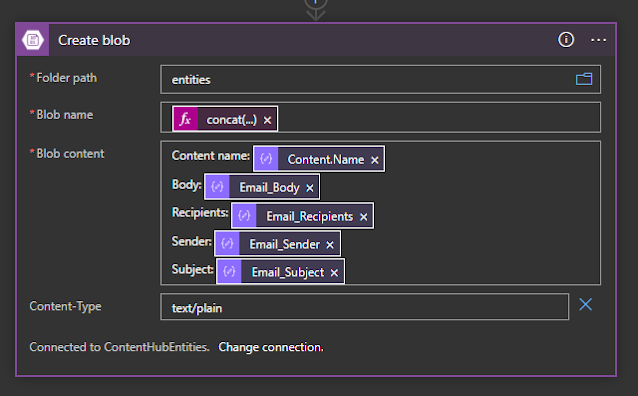
Now that the entity has been parsed, we can start using its content. We are going to store a copy of the data on blob storage. Add a new step and search for "Azure Blob storage" and select "Create blob". For this to work, you'll need a Storage account. If you don't have any yet, create the resource before continuing. Specify the folder path (aka container) that you would like to use. Keep in mind that the folder path should already exist, otherwise the action will fail. For the blob name we will use the following expression: "concat(body('Entity')?['identifier'],'.txt')". This will get the concatenate the entity identifier and add ".txt" add the end. For the Blob content, you can select any value that you would like. Look for the image below for an example.
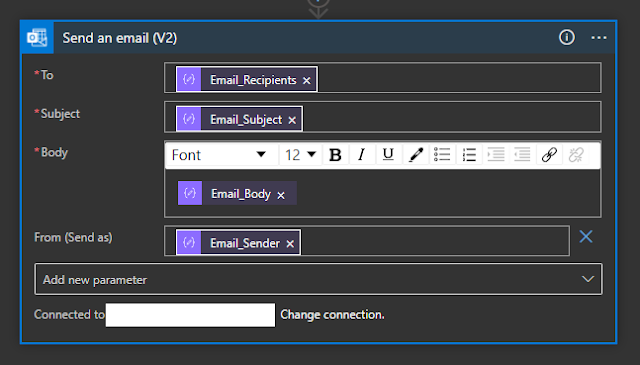
As the last step, we are going to send out an email. For the last time today, add a new step. Search this time for "Email" and select the "Office 365 Outlook" or choose another email provider to your liking. Look for the "Send an email" action and select it. Since we are using the Email content definition, we can wire up the different email properties.
Pro tip: Don't forget to hit "Save" often to make sure it's saved.
When saved you can start testing out the Logic App by hitting "Run". Activate the trigger in the Content Hub and watch the magic happen. Keep in mind that this process keeps running on the background when navigating away from the page in the Azure portal. Azure changes you for each run. So be aware when load testing a Logic app!
Happy codin'!
