Introducing Pages: The Enhanced Page Composer in XM Cloud
Marketers and developers, prepare to embark on an exciting journey with the new page composer in XM Cloud. While its freshness might spark curiosity about its age, let's focus on the key takeaway: the composer is no longer an integral part of the Sitecore XM Cloud solution. Now, you have the flexibility to run XM Cloud effortlessly on your local machine via Docker containers. However, it's worth noting that the composer is exclusively available as a SaaS product at this time.
One significant advantage of this approach is Sitecore's enhanced ability to update and upgrade the composer at a faster pace than before. This shift has addressed numerous issues that customers faced in the past, where custom editor components would break following a Sitecore update or upgrade.
Sitecore aptly named this composer "Pages," a name that perfectly encapsulates its functionality. With Pages, you can seamlessly craft web pages. It empowers you to construct a content tree, design pages by adding components, populate templates with content, and much more. Overall, it represents a substantial improvement over its predecessor, offering a notably faster and smoother experience.
Pages introduce a nifty feature – the ability to change the viewport of your browser without delving into developer tools. This enhancement significantly elevates the preview experience. To utilize Pages effectively, simply navigate to your desired page using the intuitive navigation menu on the left. At the top of the page, you'll find a selection of available page views, making it even more user-friendly and versatile.
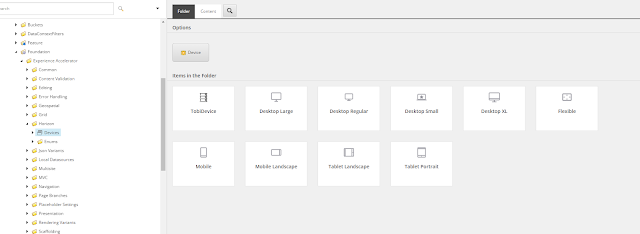
It's good to know that these page views are configurable within XM Cloud. You could easily make changes to the views. Sitecore has provided us with a manual to learn how. The changes need to be made in the Content Editor of XM Cloud.
Adding and Configuring a Device:
- Open the Content Editor of your XM Cloud instance
- Navigate to the content tree by accessing:
/sitecore/system/Settings/Foundation/Experience Accelerator/Horizon/Devices. - To add a new device, right-click on the "Devices" folder, select "Insert," and choose "Device."
- Provide a suitable name for the device and click "OK."
- Configure the following fields:
- Device Width: Set the width of the simulated device in Pages, using pixels as the unit of measure.
- Visibility:
- Disabled: This device won't be available for selection.
- Fixed: Make this device available for selection at the top of the content area.
- Optional: Allow this device to be selected from a list at the top of the content area.
- Icon: Browse and select an image for the device from the Media Library, or enter the path to an image.
- To establish the default device layout, go to the root item "Devices," and within the "Default" field, select the desired device.
Use this feature to your benefit! Until next time.


